Visual Studio Package and Development wizard provides facility to create setup of your .Net Application. But in some cases we want to control the installation steps using custom action, means we want to add some custom functionality while installing the application.
Using custom action we can handle functionalities like-
- Setting registry value while installation
- Reading registry value while installation
- Serial key implementation
Etc.
In this article, I am explaining -
How to add custom action to Windows Installer in C#?
Here I am giving complete steps with pictorial representation. Follow these steps -
Step1: First, develop your application with required functionality.
Step2: For performing your custom action while installing application, we need to add
"Installer Class" in application. Add one
"Installer Class" using
"Add New Item" to the project like this-
Step 3: After adding Installer Class to the project , add your custom functionality , Here I am adding some code in
"MyInstaller.cs" file-
//Code to perform at the time of installing application
public override void Install(System.Collections.IDictionary stateSaver)
{
System.Windows.Forms.MessageBox.Show("Installing Application...");
}
//Code to perform at the time of uninstalling application
public override void Uninstall(System.Collections.IDictionary savedState)
{
System.Windows.Forms.MessageBox.Show("Uninstalling Application...");
}
Here I have added to events, this is for custom functionality, you can write your own code which you want to perform at the time of Installing and uninstalling application.
Step 4: Now set your application in
"Release Mode" and build it.
Step 5: Now we have to add setup project for developed application, so right click on
"Solution Explorer" and click on
"Add -> New Project option".
Here you will get Project Templates dialog, Select
"Visual Studio Installer" from
"Other Project Types" option.
See this Image-
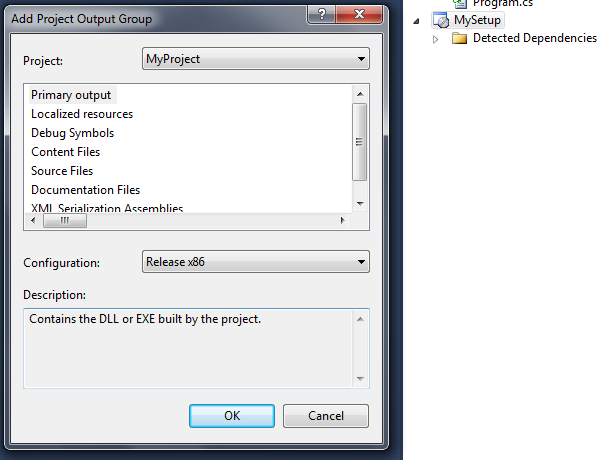
Step 6: After adding Setup project to solution, set project output for Setup project. For this right click on setup project and click on
"Add -> Project Output"
you will get
"Add project Output Group Dialog”, Here you need to set some setting like this-
After setting click on
"OK" button.
Step 7: Now to add custom action, again right click on
"Setup project" and click on
"View -> Custom Actions".
Now to set Custom action for installation right click on
"Install" click on "
Add Custom Action",
Here double click on
"Application folder" and select Primary output from Myproject and click on
"OK" button.
Step 8: Repeat same for UN-installation process also.
Step 9: Finally your solution structure will be like this-
Step 10: Now build setup project and finally build the solution. Now you are done.
To test the complete process just try to install your application now, while installing application you will get message like this-
This is the same message which we have given in
Install () event. Means whatever the action or code we will write in this event that will be perform at the time of installing application.
//Code to perform at the time of installing applicationpublic override void Install(System.Collections.IDictionary stateSaver)
{
System.Windows.Forms.MessageBox.Show("Installing Application...");
}
And when you will uninstall application you will get message like this-
Here also we can see that the code which we have written in
Uninstall () event that is executing.
Like Install () event we can handle Uninstall () event also.
//Code to perform at the time of uninstalling application
public override void Uninstall(System.Collections.IDictionary savedState)
{
System.Windows.Forms.MessageBox.Show("Uninstalling Application...");
}
These complete helps you to handle custom action while installation or uninstallation, Using these step we can implement serial key for application, means while installing application we can set expiration time for application and while uninstallation we can delete application related registry settings.
Thanks